
 Image 1 of 1
This kit is designed to provide both 12V dc and 120V AC for a wide range of applications. This compact yet robust 3 panel system will provide more power than you might think.
This was designed for:
All your 12V appliances
Small Fridge (weekends only)
Lights
Small TV’s (once and a while)
Computers, cell phones, personal devices
Radios
Light power tools
And more…
This system will provide power to a wide range of applications; HOWEVER, you will need to keep track of your electrical usage. You will need to pick and choose which appliances you run at the same time as the inverter will be overloaded. The batteries will not last forever, so you will need to get to know the system and how long the batteries last.
For cottagers who are used to having no power, this will be a major upgrade. For those who expect this to power their hair dryers and cook the Christmas turkey, you will be disappointed.
Think of this system as a lifeline to keeping your lights on and charging up your essential devices, while having a bit of extra capacity to provide those small luxuries once and a while.
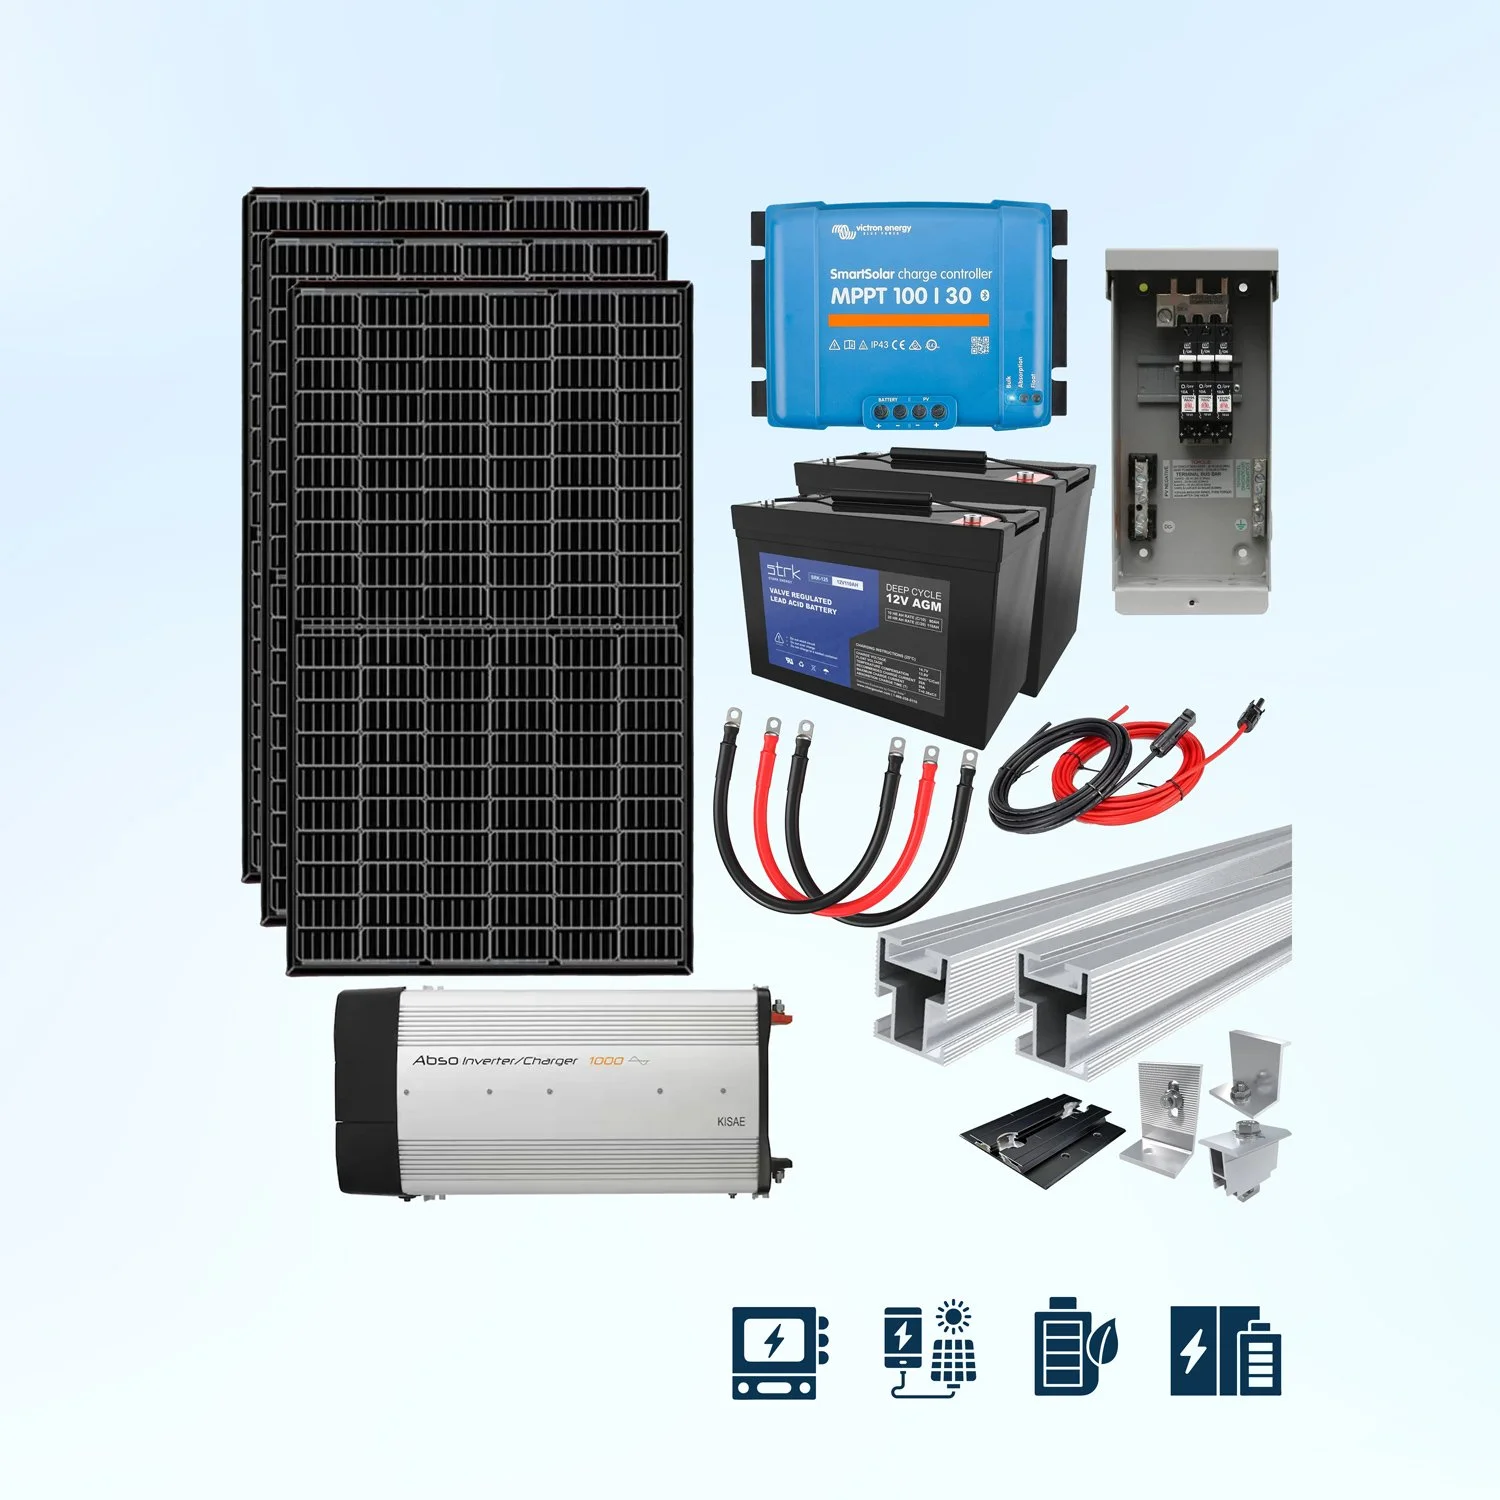
Includes:
3* 160W solar panel
2 * 20ft RPVU 90 #10 wire, red and black with MC4 Crimped ends.
Midnight breaker box
1 * 15A breaker
1* 40A breaker
Victron 100/30 MPPT charge controller
Ki 1000W inverter with 40A charger
#4 inverter Cables. Pair
2 * 10ft RPVU 90 #10 wire, red and black with no ends
2 * stark 125A 12V battery
Mounting/racking for the solar panel
Install the solar panel racking. Mount the panels to the racking. Connect all three panels in series. Connect the positive wire from one panel to the negative wire of the second solar panel and so on.
Mount the breaker box, the charge controller and the inverter near the battery
Make a parallel connection between the batteries. Connect the positive terminal to the positive terminal of the second battery, then connect the negative terminal to the negative terminal on the second battery.
Connect the battery cables to the inverter first, then connect the red wire to the positive terminals on battery one, and the black wire to the negative terminal on the same battery.
Run the red wires through the breaker box. Both black negative wires can run directly to the charge controller.
Once all connections are made to the charge controller and the inverter, connect to the battery and the solar panel.
Turn on the battery breaker first, then the solar breaker.
Warning* This equipment contains live electricity! Extreme caution should be used when handling the equipment and making connections! All work should be done by a qualified technician or licensed electrician. IES does not claim or warrant that these procedures are safe and or considered code compliant.
This kit is designed to provide both 12V dc and 120V AC for a wide range of applications. This compact yet robust 3 panel system will provide more power than you might think.
This was designed for:
All your 12V appliances
Small Fridge (weekends only)
Lights
Small TV’s (once and a while)
Computers, cell phones, personal devices
Radios
Light power tools
And more…
This system will provide power to a wide range of applications; HOWEVER, you will need to keep track of your electrical usage. You will need to pick and choose which appliances you run at the same time as the inverter will be overloaded. The batteries will not last forever, so you will need to get to know the system and how long the batteries last.
For cottagers who are used to having no power, this will be a major upgrade. For those who expect this to power their hair dryers and cook the Christmas turkey, you will be disappointed.
Think of this system as a lifeline to keeping your lights on and charging up your essential devices, while having a bit of extra capacity to provide those small luxuries once and a while.
Includes:
3* 160W solar panel
2 * 20ft RPVU 90 #10 wire, red and black with MC4 Crimped ends.
Midnight breaker box
1 * 15A breaker
1* 40A breaker
Victron 100/30 MPPT charge controller
Ki 1000W inverter with 40A charger
#4 inverter Cables. Pair
2 * 10ft RPVU 90 #10 wire, red and black with no ends
2 * stark 125A 12V battery
Mounting/racking for the solar panel
Install the solar panel racking. Mount the panels to the racking. Connect all three panels in series. Connect the positive wire from one panel to the negative wire of the second solar panel and so on.
Mount the breaker box, the charge controller and the inverter near the battery
Make a parallel connection between the batteries. Connect the positive terminal to the positive terminal of the second battery, then connect the negative terminal to the negative terminal on the second battery.
Connect the battery cables to the inverter first, then connect the red wire to the positive terminals on battery one, and the black wire to the negative terminal on the same battery.
Run the red wires through the breaker box. Both black negative wires can run directly to the charge controller.
Once all connections are made to the charge controller and the inverter, connect to the battery and the solar panel.
Turn on the battery breaker first, then the solar breaker.
Warning* This equipment contains live electricity! Extreme caution should be used when handling the equipment and making connections! All work should be done by a qualified technician or licensed electrician. IES does not claim or warrant that these procedures are safe and or considered code compliant.